Showing posts with label Glossy Accents. Show all posts

Saturday, 1 December 2012

Here I go again...more Christmas cards!

Hi Susan here...

Well I have said it before, and I bet a lot of you are the same...I can't stop making Christmas cards...
It's my favourite time of the year and my favourite kind of card. Plus I love giving them to people so I always need more.
Here are a few more that I have been making, hope you like them.


I have gone mad and used some totally different colours for this card. I can't lie I do love orange and brown together and these two backing papers have been in my stash for ages just calling out to be used on a card.
The ric-rak braid is from our local market, in a gorgeous rich shade of brown, I have used this on lots of things in the home, cushion covers and light shade trimmings, I bought lots of it, and its still going strong.


I had an odd size piece of card in my stash and when I was measuring up for trimming it to size I had a thought and this shape of card is what I came up with, different from my usual square ones but I was quite pleased with it.
I used a gorgeous Tilda edge die for the stripes, then I added stickles to the curves before adding the ric-rak.
The wooden snowflakes and tree are from packs that you can buy, they come in little wooden trays that I am sure I will find a use for once all the embellishments have been used!
I have added stickles here and there on them...well it is Christmas.


Don't you just love this image, it is a stamp from and I love it. Emma used to dress her dog up like this when it was a puppy, poor dog used to hang it's head and my grandson used to say that poor Rolo (that's the dog) must have felt like hiding away in case another dog saw her.
I have used chalks, my favourite colouring medium for this image and then added some stickles here and there.

For my second card today.....


This is the side view to show you the effect of the snowflake trim on the front of the card. I used a Tim Holtz edge die and added stickles to the snowflakes and then a strip of pearl trimming that I bought from a trimming store we have here in Manchester called Arc Trimmings.
Unfortunately as you can see I have not finished the inside of the card yet, couldn't wait to get it on the blog.


This is a close-up of the front of the card, I used a sheet of beautiful 6x6 scrapbooking paper from, it already had snowflakes all over it and a wonderful prancing stag.
I added stickles all over to highlight various snowflakes and some glossy accents on the stag to help him to stand out and be really shiny and because I haven't used any other backing paper I wanted him to add to the texture of the card.
The snowflakes are a set of dies from, I have used some Tim Holtz distressing inks to add a slight colour to them before added stickles to make them sparkle.


This gorgeous little fairy is a stamp from, I used chalks to colour the image then added stickles here and there and when completely dry I cut her out as carefully as I could before sticking her using 3D glue to the card.


Thanks so much for looking and for leaving any comments, I have really enjoyed making these cards I hope you like them and did you notice not a flower in sight, now that's a change from me!

Love and hugs
Susan xxx


Monday, 5 November 2012

A few simple notebook presents....

Hi Susan here...

I have made a few more notebooks and thought you would like to see them. Keeping my notebooks very simple this year was hard, I usually do very fancy over the top ones, but I found the more I made of these simple ones the more I liked them. I hope my daughters will like them at Christmas time.


This is the side view of my first notebook.....I have used similar colours for the notepaper as I did for the cover. I like to do this then the notebook looks more finished off and professional.


This is the notebook cover....I used a new method for constructing the notebook, I have glued the backing paper onto the stiff card then distressed the edges with a pair of scissors. This made the book covers really easy to make. I of course cover the inside of the covers as well as the front, they look quite good, but I did have to make sure that the covers were glued right to the very edges or the paper started to lift.

My backing paper is from a 12x12 scrapbooking pad that I have had for ages. It is two sided and I have used both sides of the paper for this book.
The lace and fine Georgette ribbon is from our local market.
The lettering 'EM' is a die cut from an old Sizzix die, I then coloured the letters with Promarkers and then added stickles. You can tell this notebook is for my daughter Emma!


This is a closeup of the beautiful stamp set from Chocolate Baroque. I have used Promarkers to colour the images, I cut very close to the image for the tulip bunch before sticking it in place.


My second notebook  was made very simply, using one of Emma's favourite owl stamps.


I took the colours from the backing paper on this notebook to determine what colours I should use for the notepaper.


The backing paper was from a 12x12 scrapbooking pad that has been in my stash for ages.
The lettering for the word 'Notes' is a die cut from Tim Holtz.
I added Glossy Accents to the paper after I had cut the letters out.
The ribbon is from the East of India Collection.


This little stamp of an owl is an old wooden stamp that has been in our stash for ages...The name of the manufacturer of the stamp is Funstamps, it was designed by Lindsay Mason and is called Fluffy Owl.
The leaves are also a wooden stamp that I cut close to the stamped image and then coloured with Distress Inks.

I hope you have enjoyed looking and many thanks for your comments
Love and hugs
Susan xxx

Friday, 21 September 2012

Santa Claus Post Office...

Hi Susan here...

Busy, busy, busy making Christmas cards, but I love making these and sometimes once I get started I find it hard to stop!!


The backing papers are from my stash....I cut a strip for the base and folded it into a frill then added the ribbon to it.
The ribbon is from East of India, love this really great quality ribbon.
The flowers are from Hobby Craft, the leaves have been made using a punch.


The gorgeous sentiment stamp is from Lili of the Valley set 17 Grunge Christmas Postmarks.
The image is Crafters Companions Mulberry Wood, I have used chalks to colour the image and then added stickles to the snow and glossy accents to the fairy lights.

I hope you have enjoyed looking and many thanks for your comments
Love and hugs
Susan xxx

Monday, 10 September 2012

A Christmas Card ....

Hi Susan here..

I have started early this year with my Christmas cards and I am now well on the way to having a full box to choose from to give to family and friends, I will definitely be doing this again, there has been no stress and I have really enjoyed designing my cards.

We recently bought some new stamps and this one was no exception, really got me started with the inspiration flowing....


I have had the backing papers for ages and do not know the name of company all I can say is that it is from a 6x6 scrap pack.
The ribbon is East of India...love this ribbon, I know its more expensive than my usual stuff from our market but the quality is amazing I really love it.
My flowers were a new find from Hobby Crafts, the leaves I made using card and inks.
The gorgeous sentiment is from Whimsy and has been designed by Ann Vento.


This is a close up of that gorgeous new stamp from Crafters Companion from the Mulberry Wood Collection. I used chalks to gently colour the image and then added stickles to the snow and glossy accents to the little fairy lights.


This little 'inchy' tile was made using fimo and then gluing a piece of paper to it I used a scrap of backing paper that was just lying around, you then have to rub the edges with a piece of sandpaper and add ink to the edges. These are really simple to make but look so effective on your cards and scrapbook pages.

Hope you have enjoyed looking and many thanks for your comments
Love and hugs
Susan xxx

Monday, 28 June 2010

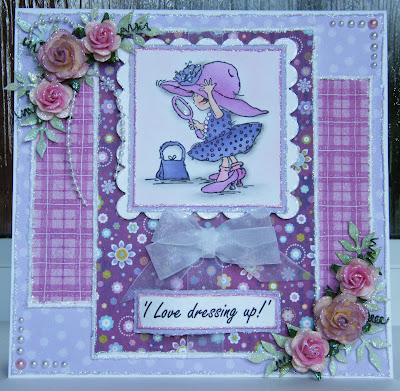
Dressing up time!.....

Hi there, it's Emma here!

I absolutely love Lili Of The Valley stamps, and this little girl is one of my favourites!! I have used the sketch from The Lili Of The Valley Challenge and rotated it. My papers are all from my stash and I've distressed and glittered all edges as usual!...


...I've coloured this gorgeous girl with Promarkers and chalks and then glittered all the edges, I also used a tiny bit of Glossy Accents on the mirror...


...My gorgeous flowers are from Wild Orchid and they are all glittered...


...I did the sentiment on the computer and glittered it up!!

Challenges I am entering with this card:

Thankyou for looking!

Love and hugs

Emma xxx

Sunday, 2 May 2010

Sunflowers


The printed image and backing papers for this card were from My Craft Studio, which I decoupaged. The centre of the flowers were finished using micro beads. I made the large sunflowers myself using a sizzix die that I layered up to six times to get the effect.
The buckle is made from chipboard that I have had in my stash for ages, I coloured it with distressing inks and covered it with glossy accents.
A Martha Stewart punch was used for the edges of my two accent papers.

Hope you like this card, thanks for looking.

Love Susan xxx

Saturday, 1 May 2010

'Love'


I love this stamp by Sarah Kay. The little kitten always reminds me of our cats and how they follow you around.
My favourite colour is pink so most of my cards end up pink!
The corner was cut using a sizzix die which I then glossed using Glossy Accents.
The large flower I made myself after reading a tutorial on one of the blogs we visited. Forgive me, but I cannot remember who's blog it was, it won't happen again!
The flower edges were stickled. The small flowers were from Prima Flowers.
Hope you like my creation. Thanks for looking.
Love Susan xxx