Monday 10 December 2012

Snow at Lexi's Creations...

Hi Susan here...

We are having a new challenge at Lexi's Creations, and the theme for this challenge is 'Snow'.
Not a difficult one and it doesn't have to be a Christmas card it could be for a winter birthday.
for full details and some fabulous inspiration from my design team call across to Lexi's Creations and join in the fun with us. This will be our last challenge for this year, but we will be back again at the beginning of January.

Now onto my card....


A simple card from me this time, I had some beautiful backing paper with some gorgeous snowflakes all over it and I didn't want to  hide any of them.

I have used a snowflake die to make the snowflakes I have added stickles all over them and some china blue distressing ink to add some cold detail to them.

The paper lace I have had for ages, rows of snowflakes with a scalloped edge, really effective. 


The gorgeous digi image is from Fairy Dust Crafts and has been designed by Lexi Lee, it is called Pengy Free Snowballs, I have used chalks to colour the image then I added stickles to the snow for a little bit of sparkle.

Hope you like the design
Thank you for all your fabulous comments and for taking the time to look at my post.
Love and hugs
Susan xxx

Saturday 1 December 2012

Here I go again...more Christmas cards!

Hi Susan here...

Well I have said it before, and I bet a lot of you are the same...I can't stop making Christmas cards...
It's my favourite time of the year and my favourite kind of card. Plus I love giving them to people so I always need more.
Here are a few more that I have been making, hope you like them.


I have gone mad and used some totally different colours for this card. I can't lie I do love orange and brown together and these two backing papers have been in my stash for ages just calling out to be used on a card.
The ric-rak braid is from our local market, in a gorgeous rich shade of brown, I have used this on lots of things in the home, cushion covers and light shade trimmings, I bought lots of it, and its still going strong.


I had an odd size piece of card in my stash and when I was measuring up for trimming it to size I had a thought and this shape of card is what I came up with, different from my usual square ones but I was quite pleased with it.
I used a gorgeous Tilda edge die for the stripes, then I added stickles to the curves before adding the ric-rak.
The wooden snowflakes and tree are from packs that you can buy, they come in little wooden trays that I am sure I will find a use for once all the embellishments have been used!
I have added stickles here and there on them...well it is Christmas.


Don't you just love this image, it is a stamp from and I love it. Emma used to dress her dog up like this when it was a puppy, poor dog used to hang it's head and my grandson used to say that poor Rolo (that's the dog) must have felt like hiding away in case another dog saw her.
I have used chalks, my favourite colouring medium for this image and then added some stickles here and there.

For my second card today.....


This is the side view to show you the effect of the snowflake trim on the front of the card. I used a Tim Holtz edge die and added stickles to the snowflakes and then a strip of pearl trimming that I bought from a trimming store we have here in Manchester called Arc Trimmings.
Unfortunately as you can see I have not finished the inside of the card yet, couldn't wait to get it on the blog.


This is a close-up of the front of the card, I used a sheet of beautiful 6x6 scrapbooking paper from, it already had snowflakes all over it and a wonderful prancing stag.
I added stickles all over to highlight various snowflakes and some glossy accents on the stag to help him to stand out and be really shiny and because I haven't used any other backing paper I wanted him to add to the texture of the card.
The snowflakes are a set of dies from, I have used some Tim Holtz distressing inks to add a slight colour to them before added stickles to make them sparkle.


This gorgeous little fairy is a stamp from, I used chalks to colour the image then added stickles here and there and when completely dry I cut her out as carefully as I could before sticking her using 3D glue to the card.


Thanks so much for looking and for leaving any comments, I have really enjoyed making these cards I hope you like them and did you notice not a flower in sight, now that's a change from me!

Love and hugs
Susan xxx


Monday 26 November 2012

Merry Christmas at Lexi's Creations....

Hi Susan here...

How are you all? Busy getting ready for Christmas, have you made all your Christmas cards yet?
If not why don't you join with us in the new challenge over at Lexi's Creations.
It's a great one for this time of year...

'Christmas'

Open for anything you want to make as long as it has a Christmas theme going through it.
There is lots of inspiration from my design team, it always amazes me that the same image can be used by a few people and their creations are so totally different. Come along and take a look and why not make a card and join in with us.

Now for my card....


Now you all know me by now about how I love making Christmas cards....this one I just wanted to use a traditional colour and make in monochromatic.
I was quite pleased with the effect.
The ribbon is from my local market.
The backing paper in red with white spots in from my stash, had it for ages, this is just a small piece.
The gorgeous red ribbed card and the main deep red cardstock is from Paper Mill Direct, it is well worth a look at this store, their cardstock is amazing and well worth buying. The ribbed card comes in 12x12 size pieces of card and you get 10 sheets per pack.
The large snowflakes are a die, I have used plain white card and then added Stickles all over the surface.


The cute little image is called Sammie Snowman, available from the Fairy Dust Crafts Store, designed by Lexi Lee.
The tickets are from Fairy Dust Crafts, I blanked out the centre and replaced with my own sentiments.
Stickles has been added to the edge of the topper and around the edges of the tickets.

Thank you for taking the time to look and please try and join in the challenge with us.
Love and hugs
Susan xxx

Wednesday 21 November 2012

Something totally different from me....

Hi Susan here...


Yes I know, it's more Christmas cards, but in a totally different style, especially for me.
I am not one normally to make simplistic cards, simple and clean is a very hard concept for me to follow, but I had a brainwave for these cards and so I thought I would show you what I came up with.


The card itself is made using a beautiful textured card from Paper Mill Direct. This is really good quality card, love using their card stock.
The snowflake trim is from an edge die from Tim Holtz, I cut it out of a piece of 6x6 scrapbooking paper with snowflakes in relief all over it, if you look closely you can see them, it was calling out to be used for this. The colour was just right for what I wanted and it had a white haze all over it so it looked really magical. I added stickles to the edges of the snowflakes to add a bit of sparkle.
The cute little stockings are a stamp from Molly Bloom, it was a freebie on the front of a magazine, I stamped the image three times and coloured them with promarkers, I then added stickles here and there and cut out one of the stamped images completely, on top of this layer I cut out two more layers of just the stockings and layered them up 3D.
The Noel was cut out using a die from Tim Holtz and some fabulous ridged card from Paper Mill Direct in a bright red.
Not overly simplistic I know, I could have left out the stockings but well they wanted to be on this card!! I know looking at the card now, it would have looked just as effective without the stockings, and at a later date I may remake the card leaving these off I think, but hey I still like the look of the card.


My next card was a real inspiration...


This one has been made using a backing card in Kraft from Paper Mill Direct which has a ridged effect.

I cut a piece of red ribbed card from Paper Mill Direct that I had left over from the card above, then tore the bottom edge .
The plain white card on the top I stamped with a text stamp and tore the bottom edge so that the two just fitted into each other nicely.

I cut out using a die the gorgeous snowflake and added some stickles to make it sparkle.
The letters are cut out using a die from Tim Holtz using the red ribbed card.
The ribbon is from our local market.


Well what do you think, different for me, but I am so pleased with them. I am definitely going to make some more in this vein, but maybe not just yet even though they were super quick to make!!

Thanks for taking the time to look and for your fabulous comments
Love and hugs
Susan xxx

Thursday 15 November 2012

Christmas is coming....

Hi Susan here....

I have a few more Christmas cards to show you that I have been working on...hope you like them.


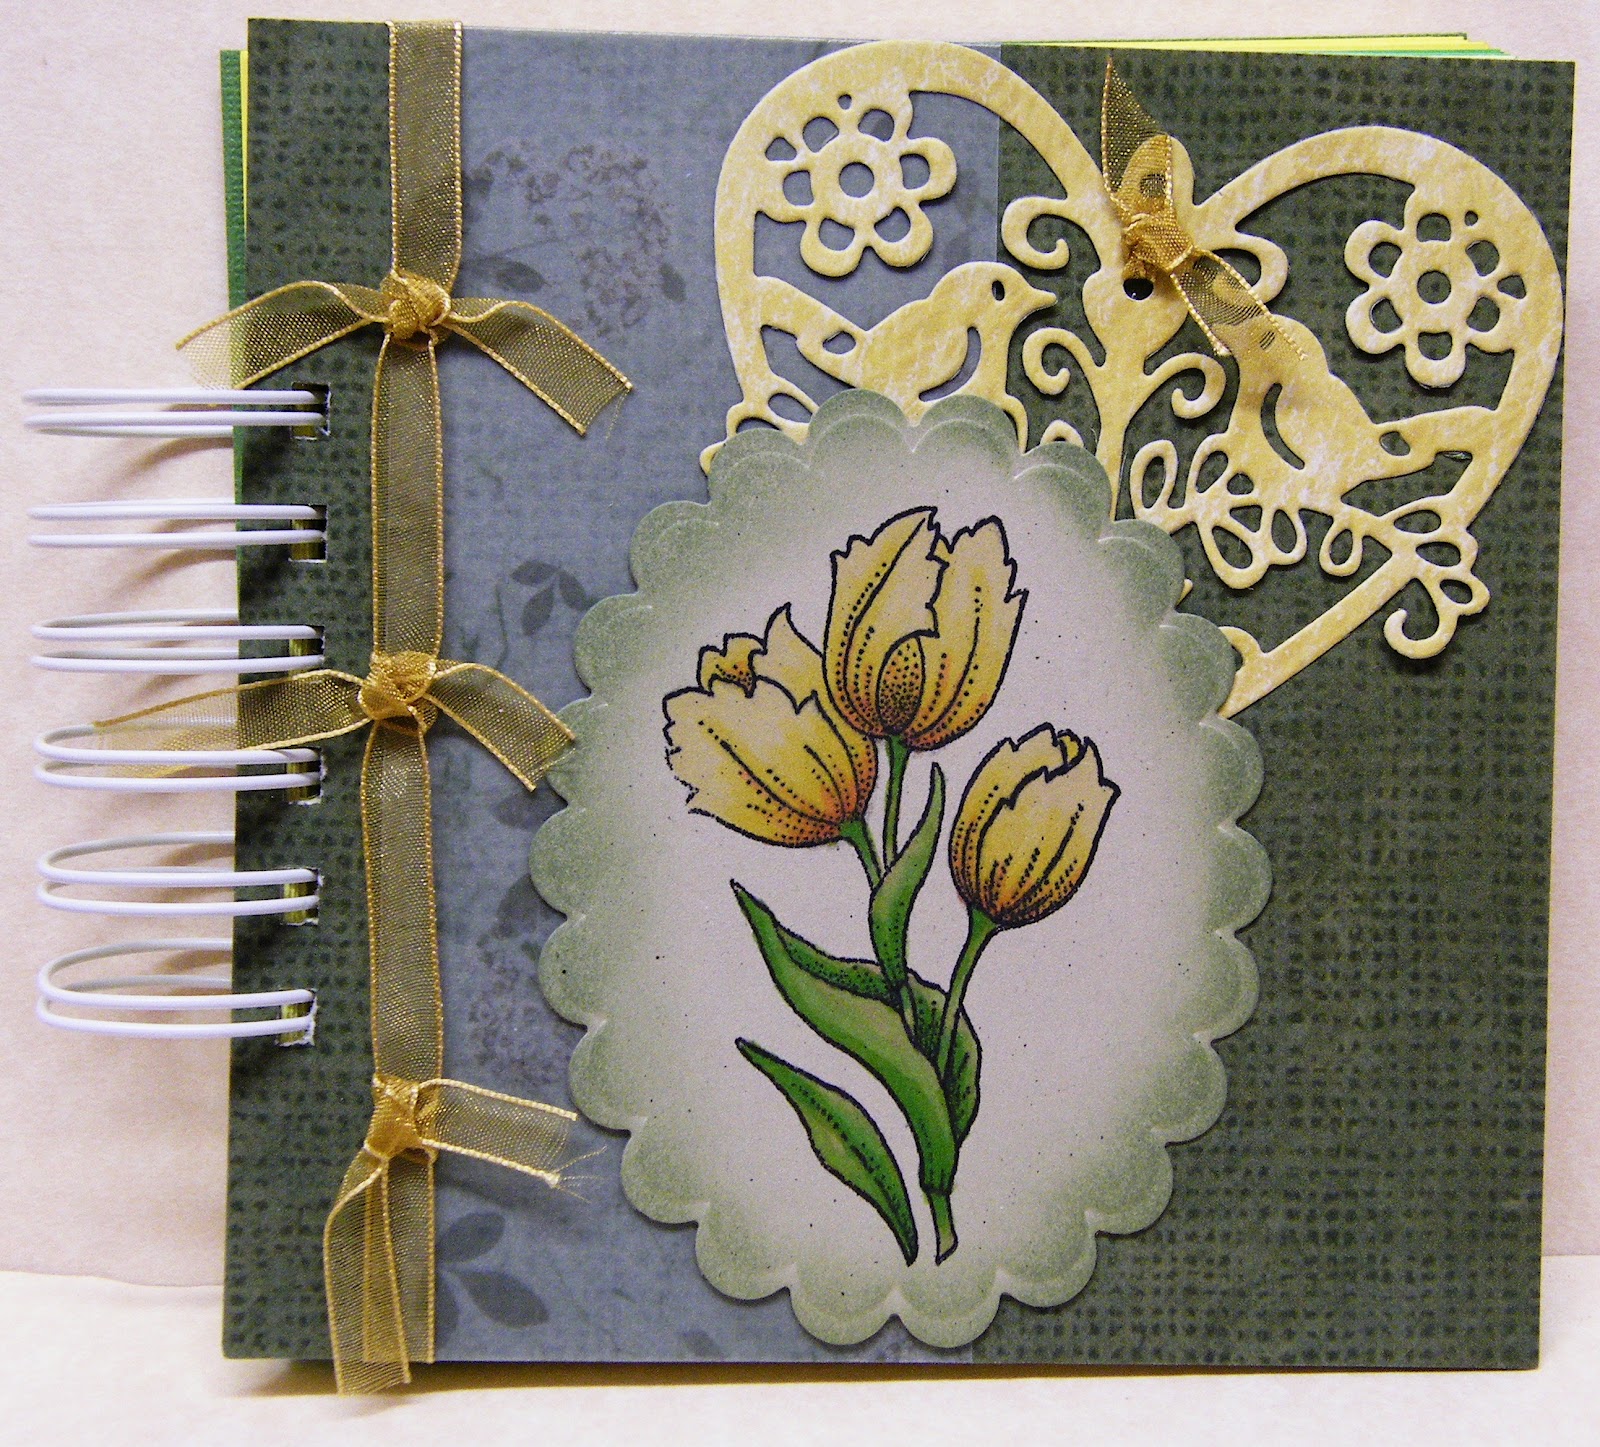
I have tried to use a few different shapes for my cards this time, as I usually make my cards square, but couldn't resist having a change. So for this particular card I have used a 5x7 inch size which I think best suited the images and layout.
I have used a set of stamps from Chocolate Baroque for this one. I inked around the edges of the squares after trimming them with Tim Holtz distressing inks in sage green and then slightly inked the birds breasts.
The beautiful swirls are a die from Marianne Designs. 
I have used base card from Paper Mill Direct.
The flowers in this most gorgeous deep red colour are from Hobby Craft.
The magical sentiment is a stamp from Prima, I love this text stamp.
My backing paper is from my stash, it is originally from a 12x12 scrapbooking pad.


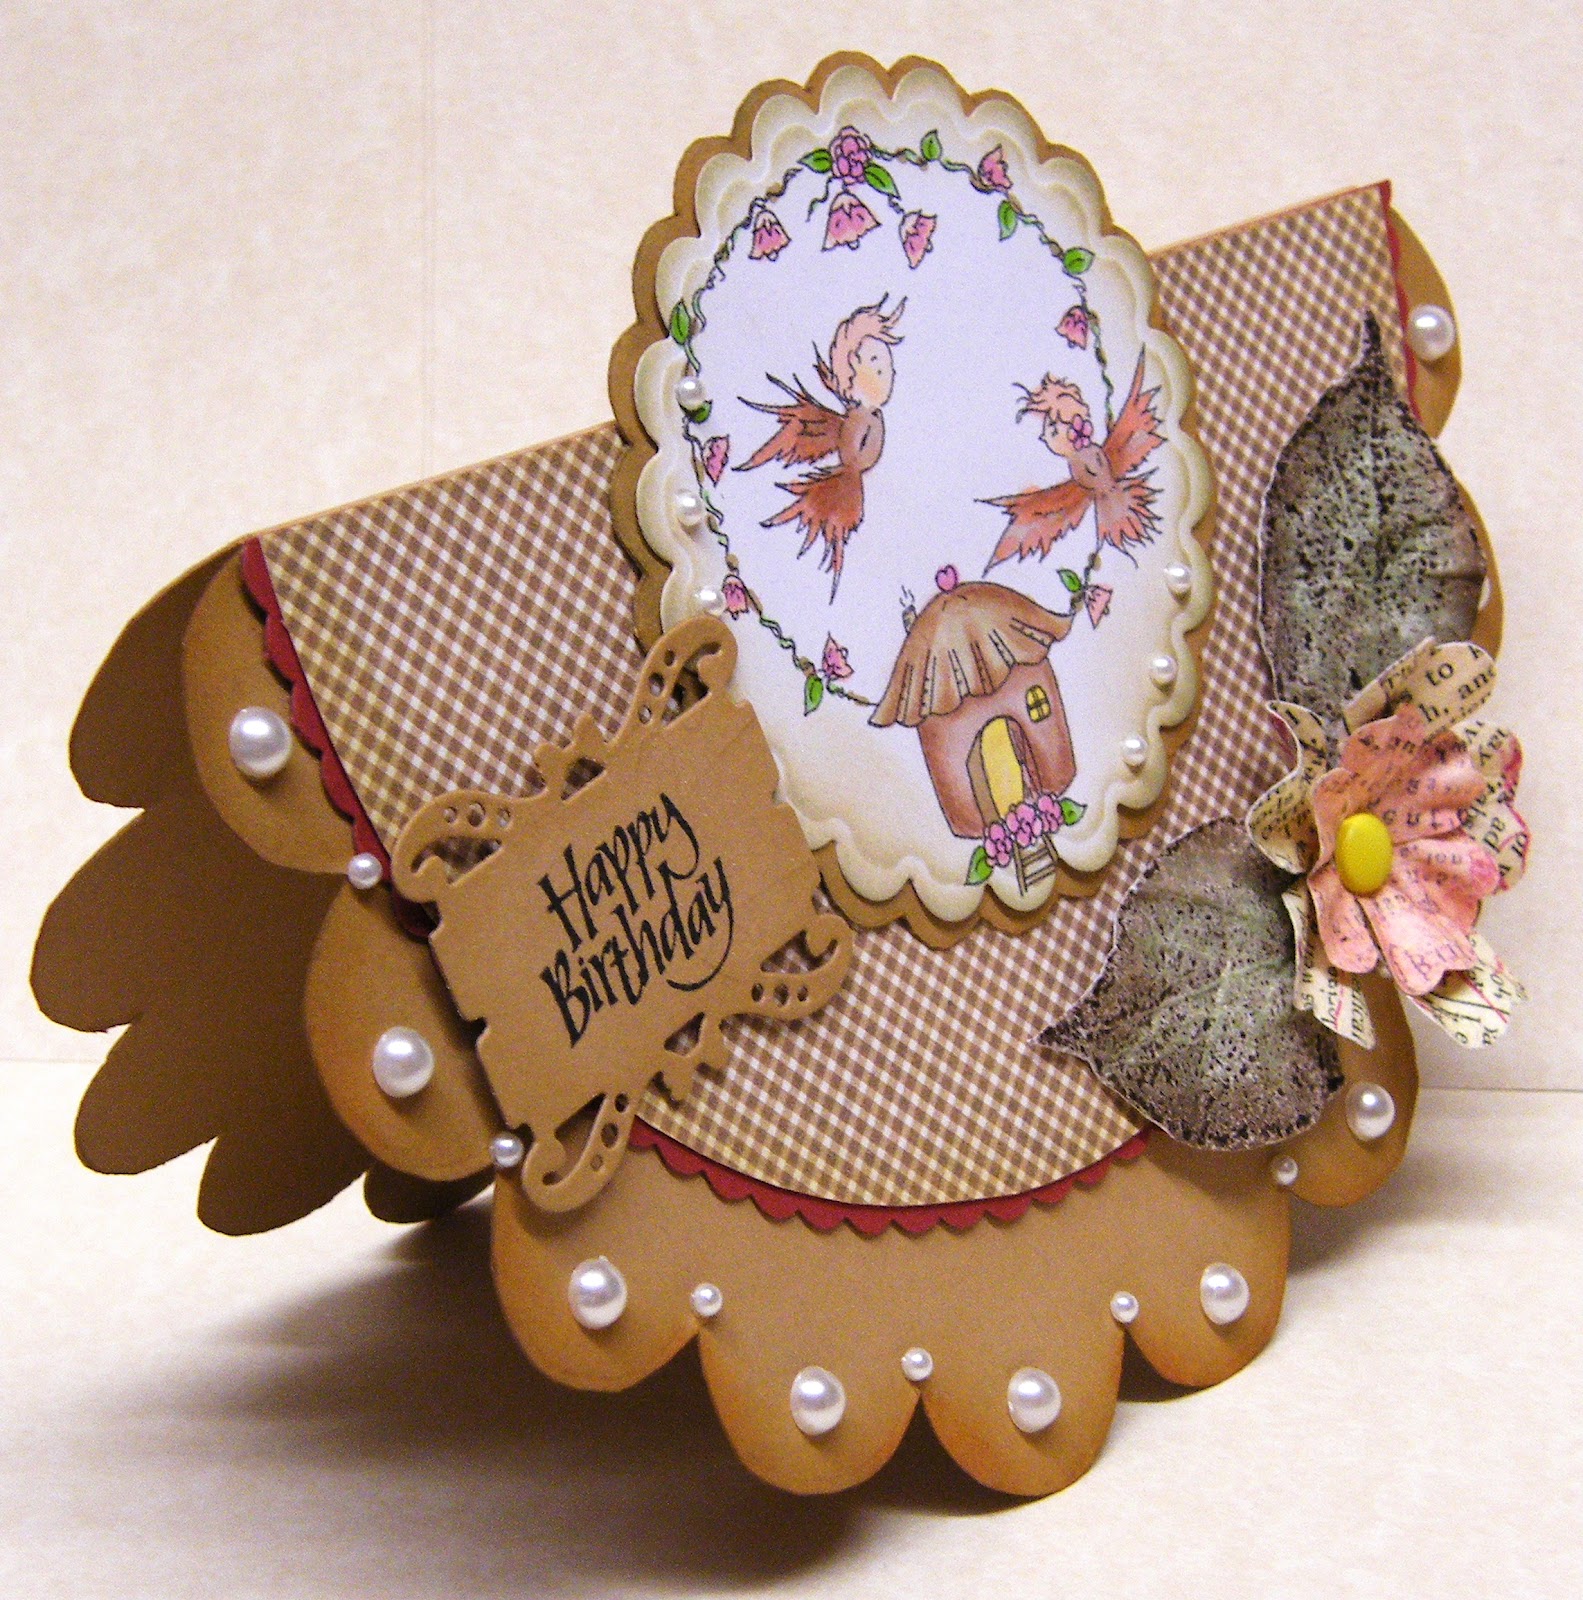
I have grouped a few cards for you to see on this post, so for my second card I have used a 4x8 inch size of card and set it up in a traditional tent style.


My backing paper was from an 8x10 scrapbooking/cardmaking pad from Papermania, it already had a fabulous design of baubles, snowflakes and the sentiment so I didn't want to cover this too much.
The flowers and berries matched my colour scheme really well, these are from Hobby Craft. I didn't want to use a solid block of colour for the flowers this time with the backing paper being really strong, these flowers matched perfectly and seemed to lighten the whole thing.
I have used an old favourite punch, for my snowflakes I have had this little punch for such a long time and use it such a lot that if it had a name on it well it isn't there now, so sorry I can't tell you who the maker is, I have used Tim Holtz distressing inks called china blue and then added some stickles and a tiny blue gem in the centre.
The beautiful china house button I bought on a trip to USA, I treasure these little china gems, I love them so much, I have tied some silk ribbon into the buttonholes.


This stamp is so adorable, it is from and I love it.
I have used chalks to colour it, then I added stickles to the dress shoes and wand, well you can't have a Christmas card without glitter can you.
The little gems falling from her wand are from my local market. I bought a little box of them, all different colours, they are a pain to work with because of their size but well worth the effort.


My next and last card for this particular post is again using this rectangular shape.


I had a lot of fun making this one, I have used several dies.
The backing paper is from a set of papers that was free on a magazine and the sad thing about this is I only have a small amount of this left over, I love the way it looks like traditional tartan fabric with stitches going through it, I have used a base Kraft card from Paper Mill Direct.
The snowman is from Tim Holtz, I used his distressing inks all around the edges using sage green and tea dye,  I stamped all over the die cut shape using tea dye distressing ink and one of my favourite text stamps.
The flowers are from Hobby Craft.
The beautiful ivy leaves are an embossing die from Marianne Designs, I have added glitter to the veins to give a bit of sparkle.
The snowflakes are a beautiful die from Memory Box, after cutting this out I glittered the whole thing using stickles.
I recently bought some small wooden embellishments and this little house was one of them, I painted it using white acrylic paints and distressed the edges with a tea dye distressing ink, then added stickles here and there.
The fence is a die from Marianne Designs I cut two of these out of Kraft card and joined them in the centre, using white acrylic paint I painted 'snow' onto the fence then added stickles to make snow glitter.


Well that's it, I hope you have enjoyed looking at my cards as much as I had making them. Funny thing about making Christmas cards, once I start I can't seem to stop, I think it has something to do with it being one of my favourite times of the year and I love to give everyone I know a card to celebrate. Now you know why I have to make so many!!

Anyway thank you so much for taking this time to look and if you would like to leave any comments I appreciate it very much.
Love and hugs
Susan xxx


Monday 12 November 2012

Thanks/Thanksgiving at LC's....

Hi Susan here...

We have started a new challenge today at Lexi's Creations and in keeping with the time of year our theme is...
'Thanks/Thanksgiving'
For full details of this challenge and our sponsor please call across to LC's Challenge Blog and join in with us, there is some absolutely fabulous inspiration from my design team to check out.

Now for my card...


I started off by using some Kraft card as the base for the card and then used some oddments of backing papers in the colours of golden yellow and burgundy, these papers have been in my bit box for ages and were originally from 12x12 and 6x6 scrapbooking pads.
The beautiful tree is a die from Arboscello Designs, I have enhanced it by using Tim Holtz distressing inks and adding some tiny gems on the leaves.

The fence was made using a die from Marianne Designs and using the same Kraft card as the base card and edged with Tim Holtz distressing inks. The flowers are from Hobby Craft and the leaves are a punch I then shaped the leaves with a ball tool.


The sentiment is my own generated on the computer, the die for the topper is from Marianne Designs.


The bird is a favourite of mine, I made it using a mould and some white fimo, once the bird had gone cold I used some distressing inks to bring out the embossing.

Thank you for taking the time to look and for all your fabulous comments
Love and hugs
Susan 
xxx


Monday 5 November 2012

A few simple notebook presents....

Hi Susan here...

I have made a few more notebooks and thought you would like to see them. Keeping my notebooks very simple this year was hard, I usually do very fancy over the top ones, but I found the more I made of these simple ones the more I liked them. I hope my daughters will like them at Christmas time.


This is the side view of my first notebook.....I have used similar colours for the notepaper as I did for the cover. I like to do this then the notebook looks more finished off and professional.


This is the notebook cover....I used a new method for constructing the notebook, I have glued the backing paper onto the stiff card then distressed the edges with a pair of scissors. This made the book covers really easy to make. I of course cover the inside of the covers as well as the front, they look quite good, but I did have to make sure that the covers were glued right to the very edges or the paper started to lift.

My backing paper is from a 12x12 scrapbooking pad that I have had for ages. It is two sided and I have used both sides of the paper for this book.
The lace and fine Georgette ribbon is from our local market.
The lettering 'EM' is a die cut from an old Sizzix die, I then coloured the letters with Promarkers and then added stickles. You can tell this notebook is for my daughter Emma!


This is a closeup of the beautiful stamp set from Chocolate Baroque. I have used Promarkers to colour the images, I cut very close to the image for the tulip bunch before sticking it in place.


My second notebook  was made very simply, using one of Emma's favourite owl stamps.


I took the colours from the backing paper on this notebook to determine what colours I should use for the notepaper.


The backing paper was from a 12x12 scrapbooking pad that has been in my stash for ages.
The lettering for the word 'Notes' is a die cut from Tim Holtz.
I added Glossy Accents to the paper after I had cut the letters out.
The ribbon is from the East of India Collection.


This little stamp of an owl is an old wooden stamp that has been in our stash for ages...The name of the manufacturer of the stamp is Funstamps, it was designed by Lindsay Mason and is called Fluffy Owl.
The leaves are also a wooden stamp that I cut close to the stamped image and then coloured with Distress Inks.

I hope you have enjoyed looking and many thanks for your comments
Love and hugs
Susan xxx

Monday 29 October 2012

A Special Birthday at Lexi's Creations...

Hi Susan here...

This is the start of a special challenge at Lexi's Creations, we are three years old this month and with that in mind we having a special challenge to celebrate this.
We have two great sponsors for this challenge and instead of the usual two winners we will be having three!
For full details of this amazing challenge call across to Lexi's Creations Challenge Blog and join in the fun with us.

The theme for our challenge is....

'Special Birthday'

now for my card....


I made this with my youngest daughter in mind, who will be thirty this year. This is one of her favourite colours I hope she likes it!!

The backing papers are all left over bits and pieces from 12x12 scrapbooking pads, I have used an edge punch for the pale pink background piece and a gorgeous die for the hearts from Marianne Designs, which I cut out of white card and then used Tim Holtz Distress Inks over the top of the embossing to bring out the details.
Some of the background pieces I have sewn around the edges for extra detail and because I know my daughter loves sewing on her cards.
The ribbon has come from our local market.


This is to give you a close up of one of my favourite images designed by Lexi Lee and available from her store Fairy Dust Crafts, it is called Christmas Shopping Phoebe.
I have used chalks to colour and shade the image.

The sentiment is my own but set into one of Lexi's tickets, I have coloured and stickled the edges of the ticket. The flowers are from Hobby Craft I really love the colour of these flowers just right for my colour scheme, the leaves are a punch I then shaped them using a ball tool, the heart pins are from Hobby Craft.

Thank you for taking the time to look at my card and for all your wonderful comments
Love and hugs
Susan xxx

Friday 19 October 2012

A couple of notebooks...

Hi Susan here...

I always make notebooks for presents, especially for my girls, we are all big note takers and have several notebooks for different things on the go all the time.

Here are just a couple that I have made just lately.....


This is the side view of the notebook, I always try to use similar colours for the paper that I used in the main book cover.


This is a closeup of the front cover. I use a firm card for the covers then use backing paper that I glue in place to cover the card before I start decorating.
I wanted to make my notebooks quite flat this year, they are usually very highly decorated, but sometimes you couldn't carry them in your handbags without a cover in case some of the embellishments got damaged.

My backing paper was from an old 12x12 scrapbooking pad that I have had for ages, I then used a tiny strip of vellum down the side.
The beautiful heart die cut is from Marianne Designs and I love it, it is so special and looks amazing.
The ribbon is from our local market.


This is a close up of the stamp image, it is part of a set from Chocolate Baroque. It is a new buy, and is gorgeous, My favourite spring flowers are tulips and I fell in love with this stamp set the moment I saw it.
I have used chalks to colour the image then used a nestability for the backer and I used Tim Holtz Distress Inks for the edges.


My second notebook uses the other part of the stamp set from Chocolate Baroque.


I used a plain white paper for the inside of this notebook.


I made this book slightly different than normal, I glued the backing paper onto the card and then distressed the edges using a pair of scissors.
I know this one is slightly more delicate in design than the previous one with the butterflies, but hey so this notebook is not carried in a handbag, I will probably make many more that can be.

The backing paper is from my stash, it is a gorgeous warm brown with a pink design. This is what gave me the inspiration for my colour scheme. Papers can do this to you, you can look at a piece of paper and instantly a design comes into your head, I wasn't sure I would make a card or a notebook, but I have a bit more so a card is not out of the question.
The butterflies are a die, I have used distress inks to colour them and then added pearls that we buy from our local market for the bodies.
The ribbon is from our local market. It is a beautiful woven ribbon with a little scalloped edge.


As I told you before this image is the second part of the stamp set from Chocolate Baroque. I used Promarkers to colour this image and then inked the edges with Distress Inks.

I hope you have enjoyed looking and many thanks for your comments.
Love and hugs
Susan xxx


Monday 15 October 2012

Halloween at Lexi's Creations....

Hi Susan here

 Can you believe that October is nearly at its end....!!
Over at Lexi's Creations we are starting a new challenge today, and the theme is

'Halloween'

Appropriate challenge for this time of the year. I love the reds, yellows, oranges, and black colours that are used on these creations.
Full details can be found on the Lexi's Creations Challenge Blog about this fabulous challenge and our great sponsor. 

Now onto my card....


My backing paper is from a 6x6 scrapbooking pad that I have had for ages, the colours in it always remind me of celebrations and this time of year. I decided on red and black for my main colours as I think they are so dramatic and I always think of these two colours when I think of vampires and bats.

The gorgeous little silver charm is from Ebay.
The sentiment ticket is originally from Fairy Dust Crafts, I blanked out the middle and put my own sentiment there, coloured the outer edge with Promarkers and then glued it to a die cut shape using black card and glittered the edge. The die is from Raindrop Echo.

I have used several dies on this card, including a gorgeous Tilda edging for the black strip at the back of the image. I put some stickles all along the edges.


This cute image has been designed by our own Lexi Lee and is available from Fairy Dust Crafts Store, it is called Vampire Bear.
I have used chalks to colour the image, I have added stickles to the moon to make it shine.
I used another die - a nestabillity die for the topper and then trimmed the shiny red card to back that.
All the card used is from Paper Mill Direct.

I hope you decide to come and join us in this fabulous challenge at Lexi's Creations.

Thank you for taking the time to look at my creation and for your many wonderful comments.
Love and hugs
Susan xxx


Tuesday 9 October 2012

A Fairy Merry Christmas...

Hi Susan here...

I am making Christmas cards like mad now....I sit in my craftroom and say I'll not make any more...but then I see a stamp and there you go I start on another card....


I have used a base red card from Paper Mill Direct and then put a piece of vellum on the top.
My flowers are from Hobby Craft, I have used stickles on the edges of the petals.
I have used some new die cut wooden leaves with my flowers for a change and a beautiful tree behind my sentiment. They come in a little tray, I am sure you will all have seen these in your craft shops.
The ribbon is East of India, this is beautiful ribbon such fabulous quality, it spoils you for any other.
My sentiment is an old wooden stamp that I have had in my stash for years, it's such a versatile stamp and I use it often. I have used a die for the backer of my sentiment, this was designed by Ann Vento for her ticket sentiments, I coloured the edges with distressing inks and then added stickles.


This gorgeous fairy is from Sugar Nellie, I have used chalks to colour the image very delicately and then added stickles to her wings and wand etc....
I have used a beautiful die cut backer in a pale pink slightly shiny card from Paper Mill Direct, this card is gorgeous, it has a beautiful sheen to it and even embosses absolutely fabulous, I have used Tim Holtz distressing inks to colour around the edges.


I hope you have enjoyed looking and thank you for your comments.
Love and hugs
Susan xxx


Monday 1 October 2012

Lexi's Creations.....Pink

Hi Susan here....

Time is passing by so quickly can hardly believe it but here we are at the beginning of October and the start of a new challenge at Lexi's Creations.

The new challenge theme is 'Pink', based on the fact that October is Breast Cancer Awareness month. Full details of the challenge and our special sponsor this time can be found on the LC's Challenge Blog. I hope you will call across and join in our challenge, the inspiration from my design team is amazing I do hope you will take the time to take a look at their work.


Now onto my card for this challenge...


The backing paper is from my stash, the flowers and buds are from Hobby Craft, the leaves I made myself. The butterflies are made using a punch and coloured with some Tim Holtz distressing inks and stickles.
The ribbon, rik rak and lace is from our local market.


One of my favourite of Lexi's Lees designs, Christmas Shopping Phoebe, available from Fairy Dust Crafts Store. Coloured using chalks, I then cut out the image really close and slightly shaped it with my bone folder and glued it onto a topper of textured card from Paper Mill Direct.

I hope you liked my creation and thank you for taking the time to look and for your fabulous comments.
Love and hugs
Susan xxx


Friday 21 September 2012

Santa Claus Post Office...

Hi Susan here...

Busy, busy, busy making Christmas cards, but I love making these and sometimes once I get started I find it hard to stop!!


The backing papers are from my stash....I cut a strip for the base and folded it into a frill then added the ribbon to it.
The ribbon is from East of India, love this really great quality ribbon.
The flowers are from Hobby Craft, the leaves have been made using a punch.


The gorgeous sentiment stamp is from Lili of the Valley set 17 Grunge Christmas Postmarks.
The image is Crafters Companions Mulberry Wood, I have used chalks to colour the image and then added stickles to the snow and glossy accents to the fairy lights.

I hope you have enjoyed looking and many thanks for your comments
Love and hugs
Susan xxx

Monday 17 September 2012

Lexi's Creations.....Make a gift anything but a card

Hi Susan here....

Today at Lexi's Creations we are at the beginning of a new challenge....this one is slightly different than what we usually do in so far as we don't want you to make a card, we want you to make the gift instead.

The theme is...
Make a Gift - Anything but a card

Bit of a challenge I am sure for some and needs some thought, but there are lots of ways that you can do this, you can alter items like books, candles and jars, you could even make notebooks, gift boxes, gift bags etc.....

Come along to Lexi's Creations and join in the fun with us on this challenge, full details can be found on the blog along with our sponsor and lots of inspiration from my very talented design team.

Now for my creation...


I altered a candle to give to a friend for a present. 
My base card was a gorgeous textured white card from Paper Mill Direct. I used an edging die to cut out the beautiful lacy edge, this is from Sizzix and then added some woven ribbon available from Fairy Dust Crafts Store.


I used two images from the Fairy Dust Crafts Store on this gift. The sentiment 'Special Friend' and the flower image 'Baby Bugs Flower'.
I coloured the image and around the edge of the sentiment using distressing inks from Tim Holtz, the flower was cut out very closely to the image so that I could layer it onto the candle and sentiment.

This was a very simple gift but looks really effective.

Thank you for taking the time to look, and for your wonderful comments.
Love and hugs
Susan xxx


Monday 10 September 2012

A Christmas Card ....

Hi Susan here..

I have started early this year with my Christmas cards and I am now well on the way to having a full box to choose from to give to family and friends, I will definitely be doing this again, there has been no stress and I have really enjoyed designing my cards.

We recently bought some new stamps and this one was no exception, really got me started with the inspiration flowing....


I have had the backing papers for ages and do not know the name of company all I can say is that it is from a 6x6 scrap pack.
The ribbon is East of India...love this ribbon, I know its more expensive than my usual stuff from our market but the quality is amazing I really love it.
My flowers were a new find from Hobby Crafts, the leaves I made using card and inks.
The gorgeous sentiment is from Whimsy and has been designed by Ann Vento.


This is a close up of that gorgeous new stamp from Crafters Companion from the Mulberry Wood Collection. I used chalks to gently colour the image and then added stickles to the snow and glossy accents to the little fairy lights.


This little 'inchy' tile was made using fimo and then gluing a piece of paper to it I used a scrap of backing paper that was just lying around, you then have to rub the edges with a piece of sandpaper and add ink to the edges. These are really simple to make but look so effective on your cards and scrapbook pages.

Hope you have enjoyed looking and many thanks for your comments
Love and hugs
Susan xxx

Monday 3 September 2012

Autumn Colours at Lexi's Creations

Hi Susan here...

I hope you are all well and looking forward to the Autumn season...those beautiful colours of autumn when the countryside takes on a whole new look and even the trees get a chance to make it look like we are having a second spring.
I love the rich vibrant colours of autumn they are so warming and comforting to look at. Over at Lexi's Creations today we are starting our new challenge and the theme is

'Autumn Colours'

We want to see all those fabulous rich colours on your creations, really show us what Autumn means to you!
For full details of the challenge and our fabulous sponsor please call across to Lexi's Creations and take a look at what my design team has produced for this challenge.

Now onto my cards.....yes I have made two for this challenge, hope you like them.

My first card is using a digi image available from Fairy Dust Crafts.

Backing paper from a 12x12 book. Beautiful shiny mottled paper with autumn leaves in the design.
The flower is from Prima, the leaves I made myself using a stamp that I embossed with clear embossing powder then carefully cutting out coloured with inks and then shaped.
The tiny silver charm is from Ebay.
The beautiful woven ribbon is from East of India.


I have used the digi image Lady Bug Mushroom, designed by Lexi Lee and available from Fairy Dust Crafts Store. Coloured using chalks and edged using distressing inks.


My second card is using a digi image available from our new sponsor My Hearts Pieces

I have used some basic Kraft card cut to shape in scallops, edged with distressing inks, the checked paper is from Nitwits.


This is to show you the side view. The pearls are from our local market.
The flower is from Prima, the leaves have been made using a stamp that I embossed with clear embossing powder then cut out and coloured with distressing inks.
The sentiment is using a stamp I have had for ages and a die from Whimsey.


This is a beautiful digi image from our new sponsor My Heart Pieces and is called Bird House. Coloured using Promarkers and edged with distressing inks.

Thank you so much for taking the time to look at my creations and thank you for your wonderful comments.
Love and hugs
Susan xxx